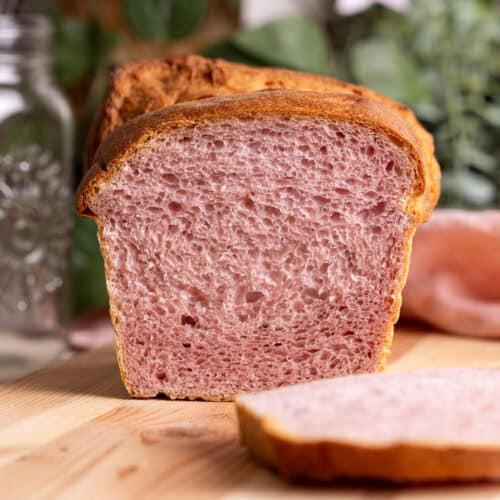
Sourdough Purple Sweet Potato Milk Bread
Meet my latest sourdough milk bread experiment: purple sweet potato milk bread. 🍠💜 It’s soft, fluffy, slightly sweet, and naturally purple thanks to mashed purple sweet potato.
Equipment
- Kitchen scale
- Thermometer
- Stand Mixer
- Saucepan
- Spatulas
- Bowl scraper
- 1-pound loaf pan (8.5” x 4.5”)
- Silicone mat
- Vinyl gloves
Ingredients
Purple sweet potato sourdough starter
- 10 grams active sourdough starter
- 20 grams purple sweet potato mashed
- 45 grams bottled water
- 45 grams bread flour
Bread dough
- 130 grams milk
- 50 grams brown sugar
- 57 grams unsalted butter sliced into thin pats
- 100 grams purple sweet potato mashed
- 280 grams bread flour
- 6 grams kosher salt
- All of the purple sweet potato starter
- Neutral oil for dough handling
- Extra milk or egg wash
Instructions
Day 1
- Prepare the purple sweet potato - Bake or steam your sweet potato until soft, a fork should easily go through the middle. To bake: poke the potato with the tip of a knife a few times, wrap it in foil, and bake for 30-45 mins at 375°F. To steam: place the potato in your steamer with water in the bottom, bring the water to a boil then lower the heat to keep it simmering, and steam for 10-20 mins. Let cool before using.
- Make purple sweet potato starter - Mix all the ingredients for your sweet potato starter together in the evening and it should be ready to use within 12 hours.10 grams active sourdough starter, 20 grams purple sweet potato, 45 grams bottled water, 45 grams bread flour
Day 2
- Prepare the liquid (8 am) - Heat the milk with brown sugar in a small saucepan over medium heat, stirring constantly, until the milk is simmering and the sugar has fully dissolved. Turn off the heat, add the sliced butter to the hot milk mixture, and stir until completely melted. Add to a stand mixer bowl and stir in the mashed purple sweet potato. Let it cool. If the potato is hard to mash, you can use an immersion blender to blend the potato with the milk mixture until smooth.130 grams milk, 50 grams brown sugar, 57 grams unsalted butter, 100 grams purple sweet potato
- “Autolyse” (8:15 am) - Make sure your liquid mixture is between 80 - 90°F (27 - 32°C), add flour and salt to the cooled liquid mixture. Use a spatula to mix until all the liquid is absorbed. Cover and let rest for 15 - 20 minutes.280 grams bread flour, 6 grams kosher salt
- Knead the dough (8:35 am) - Add all of the purple sweet potato starter to the “autolysed” dough. Knead with the dough hook on speed 2 for 20 minutes.All of the purple sweet potato starter
- Continue bulk fermentation (9 am) - Oil your hands, a bowl scraper, and your clean countertop. You can use gloves and the silicone mat on your surface to further help prevent sticking. Scrape the dough out and shape it into a ball on the oiled surface. Lightly oil the mixing bowl, then return the dough to the bowl. Cover and place in a warm spot. You will perform 2 - 3 sets of stretch and fold at 45-minute intervals. Set a timer for 45 minutes.Neutral oil for dough handling
- Stretch and fold #1 (9:45 am) - With oiled hands, lift the dough from the center. It will stretch as you lift it up and out of the bowl. If it’s sticky, use your bowl scraper to help release it. Stretch the dough into a long strip and fold in thirds like you’re folding a letter. Turn it 90 degrees, stretch it out into a long strip again and fold in thirds. Place it seam-side down back into the mixing bowl, cover, and set the timer for another 45 minutes.
- Stretch and fold #2 (10:30 am) - Repeat the same process. At minimum, complete 2 sets if short on time.
- Stretch and fold #3 (11:15 am) - Repeat one final set. The dough should feel stronger and more elastic. It should also have risen a bit. Cover and let it finish bulk fermentation at room temp for another 1-2 hours.
- Divide (12:45 pm) - Using your bowl scraper, scrape the dough onto a lightly floured surface and divide into 3 portions, approximately 240 grams each. Roll each into a smooth ball. Cover and let rest for about 10-15 minutes.
- Shape (1:00 pm) - Take each dough ball, smooth side down, flatten with your hand or roll into a rectangle, fold into thirds like a letter. Flatten again and allow it to stretch lengthwise, but keep the width slightly narrower than your loaf pan. Roll up into a log and place into the loaf pan.
- Proof (1:15 pm) - Proof your dough in a warm spot for about 5 hours. I typically use a 15-quart storage bin as my proofing box. You can also proof your dough in the oven with the light turned on and place a pan of hot water at the bottom of the oven to add humidity. The dough is ready when it is very puffy, has risen well above the rim of the loaf pan, and a gentle press leaves an indentation that slowly springs back (but not immediately).
- Preheat the oven (5:30 pm) - Toward the end of proofing, preheat the oven to 400°F (205°C) for at least 30 minutes. If proofing in the oven, remove the dough before preheating.
- Bake (6:00 pm) - Brush the top of the loaf and any exposed sides with extra milk or egg wash. Bake at 400°F (205°C) for 7 minutes, then reduce the temperature to 350°F (180°C) and bake for another 21-23 minutes. The top should be golden brown and the internal temperature should reach 190 - 200°F.Extra milk or egg wash
- Cool - Let your bread cool in the pan on a wire rack until just warm to the touch before removing it from the pan. Cool completely before slicing.
Notes
- The purple sweet potato added to the starter is purely for visual. You can certainly use your regular sourdough starter for this loaf, just add the extra 20 grams of purple sweet potato you would have used in the starter to the dough instead and use 100 grams of sourdough starter for your bread.
- Rising time and proofing time are highly dependent on temperature. So make sure you watch your dough and not the clock, use my timeline as a general gauge but pay attention to visual cues to ensure you don’t under or over proof your bread.
- I prefer using oil to prevent dough from sticking to my hand instead of extra flour to avoid adding too much flour to the dough risking a drier loaf.
- The timeline is a suggestion, feel free to modify it to fit your schedule.
Nutrition
Calories: 164kcal | Carbohydrates: 26g | Protein: 4g | Fat: 5g | Saturated Fat: 3g | Polyunsaturated Fat: 0.4g | Monounsaturated Fat: 1g | Trans Fat: 0.2g | Cholesterol: 12mg | Sodium: 206mg | Potassium: 84mg | Fiber: 1g | Sugar: 5g | Vitamin A: 1555IU | Vitamin C: 0.2mg | Calcium: 25mg | Iron: 0.3mg
Nutrition information is automatically calculated, so should only be used as an approximation.
So... was this bake worth the ferment?Let us know by rating this recipe.